Laryngoscopy is the visual physical examination of the vocal cords. The word laryngoscopy can be broken down into two parts. Laryngo – the larynx or voice box and scopy – to look at.
By the time we are ready to place an endoscope in the patient, the laryngologist should usually be able to predict what they are going to find. Laryngoscopy is the key that reveals what is behind the door. The history and the vocal capabilities testing should suggest one diagnosis pretty strongly or have narrowed the problem to a few potential issues. What the physician sees with the endoscope should generally confirm the problem that his ears tell him is already present (rather than being a search to find something, anything abnormal).
The essence of laryngoscopy is getting a light to the larynx. As stated earlier, it can be as simple as putting a mirror in the back of the throat and shining a light on the mirror (just a light and a tongue blade though are not enough to see the vocal cords). The brighter the light, the better the view, although for a detailed, optimal view in a voice lab, moving beyond the mirror is essential.
Technology has come a long way in the short space of my medical career, and glass rods, flexible fibers and video microchips on the tips of flexible tubes have opened up a new world for the examiner. High speed cameras, which I am not presently using, might aid in confirming or refuting some of the conceptions created with stroboscopy, though at present, high speed cameras are rather tedious for daily use and remain primarily in research laboratories.
There are six essential components to the physical examination of the larynx:
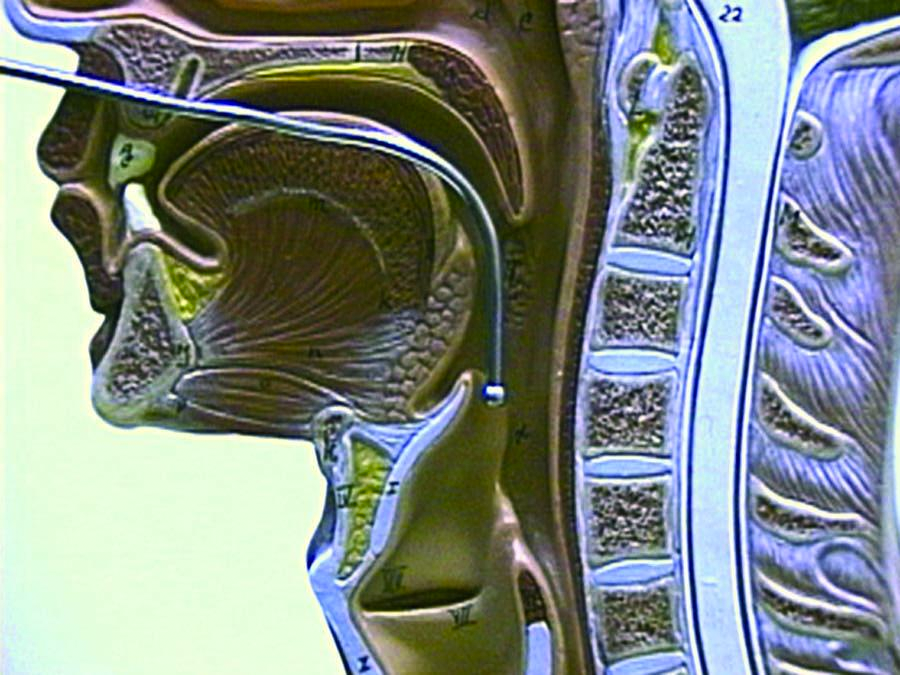
- The use of an endoscope, to view the voice box around the corners of the nose and mouth, typically combined with anesthesia, to prevent gagging, sneezing, retching, discomfort and obtain an ultra close view of the vocal folds. There are two types of laryngoscopies, rigid and flexible, and accompaning anesthesia.
- Video camera to record the voice box. If not integrated in the endoscope, it may be attached.
- Lighting Various types of lights and various color filters reveal different details.
- Stroboscope to slow the apparent motion of the vocal cord margins.
- Video recorder A method to review the motion and structure of the vocal folds in high detail and slow motion.
- Technique The hand of the person using the tool can make all the difference.
Topical 4% lidocaine with a vasoconstrictor (oxymetazolone or phenylephrine) is sprayed into the nose. My pharmacist adds pepermint and stevia to improve the flavor and smell of the spray. This combination is much better tolerated than cetacaine (Benzocaine with a banana flavor). An oral topical anesthetic such as 4% lidocaine may be sprayed onto the soft palate, posterior pharynx and base of tongue. Again, some people can be examined without anesthesia. See examples of a normal female during a flexible exam.
If close inspection of the larynx is anticipated, 4% topical lidocaine may be dripped onto the epiglottis and laryngeal introitus (the vocal cords). This is often done under direct visualization with the rigid or flexible endoscope to be sure the entire surface of the larynx is covered. Typically, the anesthetic is dripped into the larynx in several aliquots since the first drops cause significant gagging.
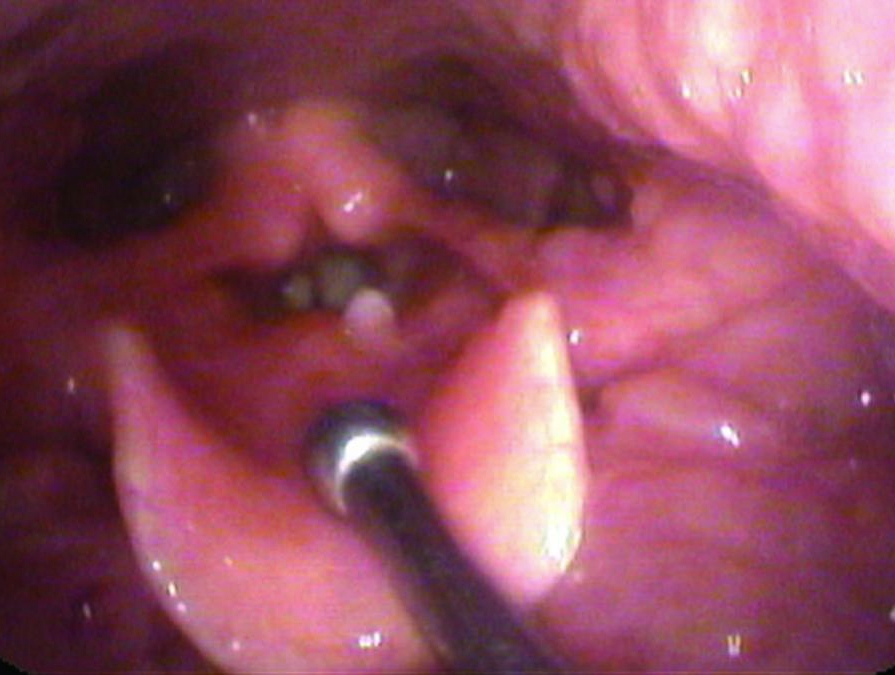
A curved cannula such as the Abraham cannula may be utilized to direct the anesthetic. It may be dripped without visualizing the larynx while listening for a laryngeal gargle, the gargle sound produced when liquid is sitting on the phonating vocal folds.
The Mucosal Atomization Device (MAD) is another option. It may be bent to direct the anesthetic onto the vocal cords.

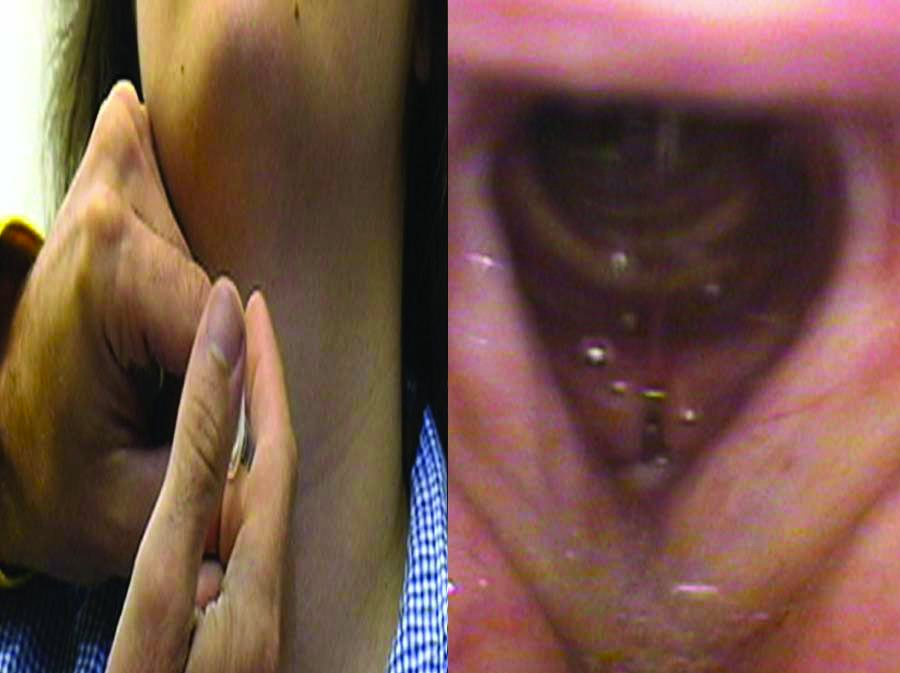
Alternative methods include injecting into the trachea with a 25 gauge needle via the cricothyroid membrane. The needle is angled slightly downward and syringe aspirated to assure intraluminal placement. The ensuing cough blankets the larynx with topical anesthesia.
Patients with tracheostomy tubes may be anesthetized by placing a folded sponge over the tube and injecting through the sponge with a needle. Holding the hub of the syringe against the sponge not only spares the examiner a shower but directs the cough and anesthetic up through the larynx.
All of these methods allow for intimate inspection of the vocal cords and below the vocal cords.
Video camera
I started with a Karl Storz telecam SL when attaching a camera to a rigid or flexible fiberoptic nasopharyngoscope. Though adapters can be put on almost any camera, the very small medical cameras with the D-adapter common to so many medical endoscopes, are easily held in one hand and provide exquisite detail and color. The zoom feature was helpful with the flexible scope, but too much light is lost by zooming with the rigid endoscope. The flexible scope is smaller in diameter to fit through the nose rather than the mouth and this can present a very small image on the video monitor.
I mentioned the Pentax camera EPK-1000 above which mates directly with their "chip scopes."
In 2011, I upgraded to the Kay-Pentax EPK-i processor to accommodate high definition imaging with the Pentax VNL-1590STi endoscope. I capture the video images at 1280 x 720 pixels (720p60).
In 2011, I upgraded the camera processor for the rigid endoscope to a Toshiba 3CCD HD Camera Head (Model IK-HD1H G2) purchased from Kay-Pentax with a C-mount adapter. I record images with the rigid endoscope at 1080i (1920 x 1280 at 29.97 fps). You can get some idea of the clarity by looking at a recent video of normal female vocal cords. Although the YouTube video is HD, there is still some compression artifact not present on the original footage.
Light
Constant: Xenon light is my preferred light, but Halogen can be used. LED lights are becoming available since 2011. All can usually be color balanced by the video recorder, but if not, different degrees of redness will be seen. Because the light is a constant illumination the vocal fold edges will be sharp during breathing but blurred during phonation. That is because typical video devices record at about 30 frames per second while the vocal folds during speech vibrate at about 100 cycles per second in men and about 200 cycles per second in women. The video cannot capture information that quickly. Then if someone is singing, vibrations can easily top 1000 cycles per second.
Strobe: Various devices have been devised to capture the motion of the vocal folds. Stroboscopy utilizes a technique or slight of hand to give the appearance of slow motion. Two methods are utilized. These special devices may flashes a light or shutter the camera at about 2 cycles per second different than the pitch of the voice. Therefore, it has a microphone to determine the pitch of the voice which triggers the light. This shuttering causes the video recording to appear to be in slow motion. While this apparent slow motion misses some information that an ultra high speed recording might catch, it does add significant detail to the visual examination of the vocal cords. I use and prefer the Kay Elemetrics strobe light. There are other alternatives, that at this point are not as refined as the Kay light, though perhaps less expensive.
In 2011, at the annual meeting of the AAO-HNS there are now a number of less expensive stroboscopy units, some with LED lights that seemed to give pretty good views.
High speed recording: High speed film has been utilized though it is very expensive. There are now digital video capture boards that can briefly capture high frame rates. See Kay Elemetrics. Some practicioners are using this technique exclusively.
Video recording
This key component can be any type of tape recording. I have used VHS, S-VHS, betacam and Sony DVCAM in the past. This is a digital recording tape that runs at a higher speed than the consumer version miniDV, though the resolution is the same. I used the DSR-30 tape deck because it had a jog-shuttle which I find essential to review motion, especially ABduction and ADduction. Vocal movement is so fast that I usually get 2 to 4 frames of the motion at the video recorders rate of 29 frames per second. The DSR tape deck also has a firewire output that can dump the video directly to a computer (my Apple Mac’s all come with Firewire) which is how all the video, audio and photos were obtained for this web site. Without a recording of some type, the human eye misses too much essential information.
In 2009, I converted to digital direct capture. I used a Canopus ADVC-110 analog to digital converter and capture via firewire directly into a Macbook Pro laptop with Final Cut Pro. This has worked very well.
There are S-video outputs on all my cameras. I run the S-video into the front of the ADVC-110.The patient wears a headset mic (Audio Technica PRO8HE) connected to a preamp (ART-OPL Tube mic preamp) and routed into the RCA audio jacks on the front of the Canopus converter. A Firewire 400 connectionon the back of the Canopus sends the digitial signal to the Macbook Pro and Final Cut Pro captures the AV signal using the Non-controllable device setting in the capture window. I store the quicktime mov files on LaCie 4big Quadra disks configured as RAID 5. On the back of the Canopus, I connect the S-video connection to a large flat screen monitor for reviewing the video files.
In 2011, with the new HD endoscopes, I upgraded my video converters. I now use a Gefen DVI-HDSDI scaler to convert the digital video coming from the Pentax EPKi endoscopy camera. The Pentax VNL-1590STi endoscope has an unknown resolution, but the EPKi outputs a graphics signal via DVI at 1280 x 1024p at 59.99 Hz. The Gefen DVI-HDSDI scaler converts this output to 1280 x 720p at 60 Hz. The SDI cable carries the signal to an AJA ioHD converter. The AJA ioHD combines the signal with audio and converts the signal to Firewire 800 for input into an Apple MacBook Pro laptop. I capture the signal with Final Cut Pro v. 7.0.3.
The AJA ioHD allows me to convert video signals from my older standard definition endoscopes to capture them at 525i, or the signal from the HD endoscope at 720i or I can capture the signal from the rigid endoscope with the Toshiba camera at 1080p, each of which takes up significantly more disk space but with higher resolution images.
Technique - closeness
I give a number of talks which demonstrate that the hand of the physician is perhaps more important than the tool. The tool does make a difference, but how that tool is used makes an even greater difference. As a specific example, I like to use the example of closeness. The closer the examiner moves the endoscope to the larynx, the more the vocal cords fill the field of view - particularly important since the flexible endoscopes use such a wide angle of view, every millimeter closer brings out much more detail. Additionally, the closer the endoscope, then the closer the light is and the brighter the vocal cord will be illuminated. With the automatic shutters on the video processors, this then shutters down the f-stop or lowers the gain of the video and improves resolution.
Also as one approaches the vocal cord, the tip of the scope can be angled for a different perspective. It is possible to obtain a view parallel to the vocal cords so that objects stand out in relief.
So if we combine the digital recording technique with a great light source and a chip endoscope and we use the topical anesthesia described above and the examiner takes the time to get close, then the correct diagnosis is made much more often.
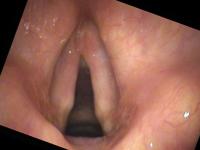
Let me use an example of papilloma on the vocal cords. The middle column shows approximately how much closer the view in the right column will be compared to the previous view.
| Comments | Area | Closer views |
| This represents a typical endoscopic view from above for many examiners with my high quality "chip" endoscope (Pentax VNL-1170K). In each of the following rows, I have selected a frame of the video to demonstrate how detail improves & the rectangle in the middle column approximates how much closer the field of view is. | 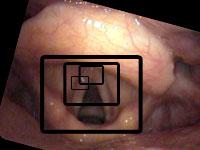 |
 |
| Moving the endoscope closer reveals more detail and hints at the possibility of papilloma on the right anterior vocal cord with a red shading. | 
|
|
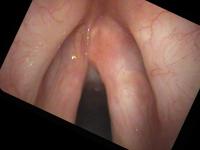
| This is about as close as I can get without anesthesia as the scope starts to touch the arytenoids with any slight movement on the part of the patient or examiner. The right anterior cord is still just reddish, but if you click on it to view the enlargement, then you can see the typical stippling of papilloma. | 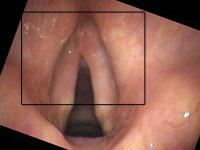
|
|
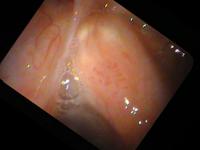
| After topical anesthesia, I can touch the area of interest and obtain this view. The red stippling of the papilloma are loops of blood vessels and you are viewing the tip of the loop. | 
|
|
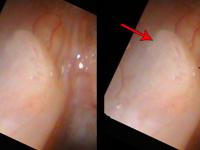
| This area of papilloma on the left cord I didn't appreciate in any of the previous images. In addition to magnification and light gain, as the scope moves closer, the perspective can change and this view on the right is almost parallel to the cord, so the left cord papilloma stands out more, it has the little red vessels within it and it "covers up" the normal vessels running along the cord. | 
|
|